Last Updated on November 18, 2022 by tawhid
If you’re like most people, your oven is one of the first things you’ll notice isn’t working properly when you take your RV out for the first time. Here are a few tips on how to light an oven in an RV: 1. Make sure all the knobs are in the “off” position and that the pilot light is out.
2. Open the oven door and look for the ignition hole. It’s usually located near the burner controls. 3. Insert a long match or lighter into the ignition hole and turn on the gas by rotating the knob to “light.”
4. Hold a flame to the igniter hole for 30 seconds or until you hear a clicking sound. 5. Close the oven door and turn on all of the burners to high for about 15 minutes, then open all windows and doors to ventilate before using your oven..
- Find the pilot light on your oven
- It is usually located near the front of the oven, and may be hidden behind a small metal cover
- Lift up the metal cover to reveal the pilot light
- Use a lighter or match to ignite the pilot light
- Hold the flame to the pilot light for about 30 seconds, or until you see the flame start to grow larger
- Once the pilot light is lit, you can replace the metal cover and begin using your oven as normal
How to Light a Furrion Camper Oven
If you’re like most people, you probably don’t give much thought to your Furrion camper oven. But if you’re ever in a situation where you need to light it, it’s important to know how. Here’s a step-by-step guide on how to do it:
1. Start by opening the oven door. You’ll see a knob on the side that controls the gas flow. Turn it to the “on” position.
2. Next, locate the igniter switch. It’s usually located near the front of the oven or on the control panel. Press and hold this switch for about 30 seconds.
3. Once the igniter switch is activated, you should see a small flame start inside the oven chamber. If not, repeat steps 1-2 until you see a flame.
4. Now that there’s a flame inside the oven, turn the knob on the side of the oven to your desired cooking temperature (usually between 250 and 350 degrees Fahrenheit).
The flame will adjust itself accordingly.
5..
How to Light a Magic Chef Rv Oven
If you’re like most people, you probably don’t give much thought to your RV oven. But if you’re not careful, lighting it can be a bit of a challenge. Here are some tips to help you light your Magic Chef RV oven:
1. Make sure that the knob for the gas valve is in the “off” position before you begin.
2. Open up the door to the oven and take a look at the igniter. You’ll see a small button or switch near the base of it – this is what you’ll need to press or flip in order to ignite the gas.
3. With the door open, turn on the gas valve by rotating it clockwise until it stops. Then, press and hold down on the igniter button or switch for about 30 seconds before releasing it.
4. If everything has gone according to plan, you should see (and hear) a little spark as the gas ignites and then flames start shooting up from inside the oven cavity.
Close the door and allow preheat for about 10-15 minutes before cooking anything inside.
Rv Oven Pilot Light Won’T Light
If you’re like most RVers, you enjoy the convenience of cooking in your own rig. But what do you do when your RV oven pilot light won’t light?
There are a few things that could be causing the problem.
First, make sure that there is gas flowing to the oven. If the tank is empty, or if the shut-off valve is turned off, the pilot light won’t be able to ignite.
Next, check the igniter.
If it’s dirty, it may not be sparking properly. Clean it with a wire brush and try again.
If those two things don’t work, then it’s possible that the thermocouple needs to be replaced.
This part controls the flow of gas to the burner and if it’s not working properly, gas will leak out instead of igniting.
You can usually find replacement parts at your local RV dealer or online. Or, if you’re feeling handy, you can even try replacing them yourself!
How to Start a Greystone Camper Oven
If you’re like most people, the thought of cooking in a camper oven may seem a bit daunting. After all, you’re used to having a full-size oven at home with all of the bells and whistles. But don’t let the size fool you – campers can be just as equipped for cooking up a storm as their larger counterparts.
Here’s how to get started with your Greystone camper oven:
1. The first thing you’ll need to do is find a good spot for your camper oven. It should be level and close to an electrical outlet.
Once you’ve found the perfect spot, open up the door and remove any packaging material inside.
2. Preheat your oven before cooking by turning it on to the “Bake” setting and setting the temperature dial to 350 degrees Fahrenheit. Let it run for about 15 minutes so that it reaches the correct temperature.
3. When it’s time to start cooking, begin by prepping your food as you would if you were using a regular oven at home. Place your pans or dishes on the wire racks inside the oven and set them according to whatever recipe you’re following – typically,the top rack will be used for foods that need less heat exposure, while the bottom rack is better for items that require more intense heat (such as pizzas).
4 .
Once your food is ready, close the door and set timer according to your recipe’s instructions . Be sure not to open the door during cooking , as this will cause heat loss and could result in uneven cookin g . When t he timer goes off , voila!
You’ve successfully cooked in your Greystone camper ove n .
Wedgewood Vision Rv Stove How to Light Oven
As you know, lighting an oven can be tricky- especially if it’s your first time. But don’t worry, we are here to help! Here is a quick and easy guide on how to light your Wedgewood Vision RV stove oven:
1) First, make sure that the oven is turned off and cool to the touch. Then, open up the oven door and take a look inside. You will see two metal rods near the back of the oven- these are called igniters.
2) Next, locate the gas valve knob on your stove (it should be located near the front of the unit). Make sure that the knob is turned to “off” before proceeding.
3) Now it’s time to actually light the oven!
Start by holding a lighter or match next to one of the igniter rods. Then, turn on the gas valve knob until you hear a clicking sound. Once you hear this sound, quickly move your flame over to touch both igniter rods at once.
Doing this should create a spark which will then ignite the gas in your oven and start pre-heating it.
4) That’s it! Once your oven has reached its desired temperature, simply turn off the gas valve knob and enjoy your perfectly cooked meal!
Credit: www.etrailer.com
How Do I Light the Pilot on My Rv Oven?
If your RV oven is equipped with a pilot light, lighting it is a simple process. First, make sure that the knob for the burner you wish to light is in the “off” position. Then, locate the pilot light assembly on the front of the oven.
There will be a small metal knob next to the assembly – turn this knob to the “pilot” position. Once in this position, press down on the knob and hold it while you use a long match or lighter to ignite the pilot flame. Once lit, continue holding down on the knob for 30 seconds before releasing it.
If done correctly, your pilot light should stay lit – if not, repeat these steps until successful.
How Do You Start an Rv Oven?
If you’re like most people, you probably don’t use your RV oven very often. Maybe you’ve only used it a few times, or maybe you’ve never even used it at all. But if you’re planning on hitting the road for an extended RV trip, then you’ll need to know how to start your RV oven.
Here’s a step-by-step guide to help you get started:
1. Preheat the oven before starting it. This will help ensure that your food cooks evenly and prevents any potential problems with starting the oven.
2. Start by lighting the pilot light. If your RV doesn’t have a pilot light, then consult your owner’s manual for instructions on how to start the oven without one.
3. Once the pilot light is lit, turn on the gas valve to begin supplying gas to the oven.
Again, consult your owner’s manual if you’re not sure which valve controls the gas supply to the oven.
4.. Set the temperature knob to your desired cooking temperature and wait for the oven to preheat before beginning to cook anything in it.
. Most RVs have electric ignition for their stovetops andovens, so once everything is set there should be no problem getting started!
How Do You Light the Stove in an Rv?
If you’re like most RVers, you probably enjoy cooking while on the road. But if you’ve never lit a stove in an RV before, it can be a bit daunting. Here are some tips to help you get started:
1. Make sure all the vents are open. The vents help circulate air and prevent the build-up of dangerous gases.
2. Find the pilot light knob and turn it to the “on” position.
You may need to hold it down for a few seconds before the pilot light ignites.
3. Once the pilot light is lit, turn on your stove’s burner knobs as usual. If your stove has an electric ignition, push the button or flip the switch until you hear a clicking sound.
Then turn on your burner knob(s) as usual.
How Do You Light a Trailer Oven?
If you have a trailer oven, chances are you’ll need to light it at some point. Here’s how to do it:
First, find the pilot light.
This is usually located near the bottom of the oven on the back wall. Once you’ve found it, turn it on by rotating it clockwise until it clicks.
Now, use a long match or lighter to ignite the pilot light.
Hold the flame to the pilot light for about 30 seconds to give it time to heat up and start burning.
Once the pilot light is lit, turn on your oven by pressing the “on” switch or turning the knob to the “on” position. The oven should now be lit and ready to use!
How to light a travel trailer oven
Conclusion
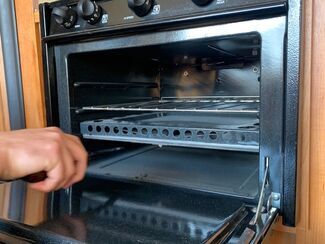
If you’re ever in a pinch and need to light your oven while RVing, here’s a quick guide on how to do it. All you need is a match and some patience. First, open the oven door and locate the pilot light.
It’s usually located near the back of the oven or near the bottom. Then, use a match to light the pilot light. Hold the flame to the pilot light for 30 seconds or until you see the gas igniting.
Once it’s lit, close the oven door and give it time to preheat before cooking anything in it.