Last Updated on March 23, 2023 by tawhid
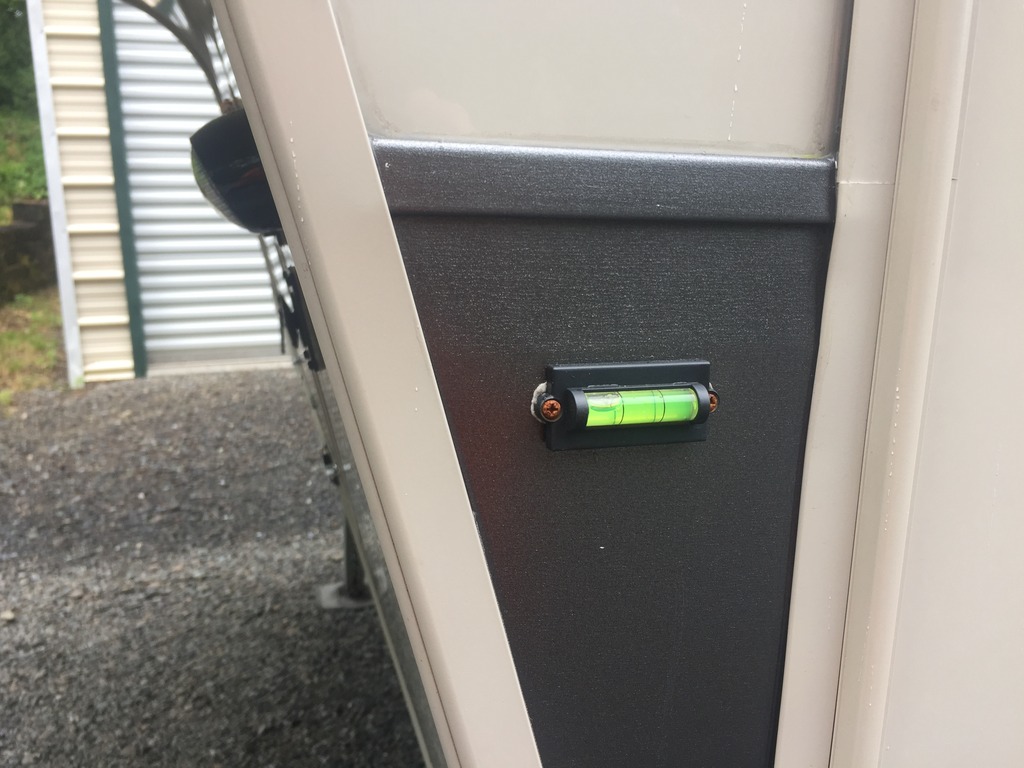
Installing bubble levels on a travel trailer is a simple process that can be done in just a few minutes. First, determine where you want to install the bubble levels. Most people choose to install them near the door or windows of the trailer.
Next, use a drill to make pilot holes for the screws. Finally, use screws to attach the bubble levels to the trailer.
- Begin by cleaning the area where the bubble level will be installed with a mild soap and water solution
- Next, use a drill to create pilot holes for the screws that will secure the level in place
- Once the pilot holes are drilled, insert the screws and tighten them until the level is snug against the trailer surface
- Finally, check to make sure that the bubble levels are functioning properly before hitting the road!
Best Rv Bubble Level
Are you looking for an RV bubble level? If so, you’ve come to the right place! In this blog post, we’ll discuss the best RV bubble levels on the market, what to look for when choosing one, and how to use it once you have it.
By the end of this post, you’ll be an expert on all things RV bubble levels!
First, let’s talk about what an RV bubble level is and why you might need one. An RV bubble level is a tool that helps you level your recreational vehicle (RV) when parked.
It’s especially useful if you’re parking on uneven ground or in a tight spot. Many RVs have built-in leveling jacks that can be used to level the vehicle, but a bubble level can help fine-tune the process and ensure that your RV is perfectly level.
Now that we know what an RV bubble level is and why you might need one, let’s talk about how to choose the best one for your needs.
There are two main types of RV bubble levels: those with onebubble and those with two bubbles . A single-bubblelevel is less expensive and easier to use , but it’s not as accurate as a double-bubblelevel . If accuracy is important to you , go with a double-bubblelevel.
Otherwise , a single-bubblelevel will do the trick .
Once you’ve selected the type of RV bubble level you want , it’s time to start shopping around ! The good news is that there are plenty of great options available on the market today .
We’ve compiled a list of our favorite three below , based on price , features , and customer reviews .
Where to Place Levels on Travel Trailer
If you’re like most people, you probably don’t give much thought to where you place the levels on your travel trailer. After all, as long as the trailer is level, that’s all that matters, right? Wrong!
The location of your trailer’s levels can actually have a big impact on how well your trailer functions and how comfortable it is to live in. Here are some tips on where to place levels on travel trailer:
1. The front of the trailer should be slightly higher than the rear.
This will help ensure that water drains away from the front of the trailer and doesn’t pool around the back.
2. The left side of the trailer should be slightly higher than the right side. This helps prevent rainwater from pooling on one side of the trailer and keeps everything more balanced overall.
3. Place one level at each wheel well. This helps you make sure that each wheel is properly supported and prevents any uneven settling which could cause problems down the road.
4. Finally, place a level across the door opening.
This ensures that when you open or close the door, it won’t rub against anything and potentially cause damage.
How to Level a Camper on Blocks
If you have ever been camping, then you know that one of the most important things to do is to level your camper. This can be tricky, especially if you are new to camping. But don’t worry, we are here to help.
In this blog post, we will walk you through how to level a camper on blocks.
First, let’s talk about why it is so important to level your camper. When your camper is not level, it can cause a number of problems.
For example, your doors may not close properly or your windows may leak. Additionally, leveling helps ensure that all of your appliances work properly and that your furniture doesn’t slide around. Trust us, you want to avoid all of these problems!
Now that we’ve convinced you of the importance of leveling your camper, let’s get into how to do it. The first step is to find some level ground. This may seem like an obvious step, but it is very important nonetheless.
Once you have found a spot that looks level, park your camper in place and put on the parking brake.
Next, take out your leveling blocks and place them under the low side wheels of your camper. You will want to use as many blocks as necessary to get the camper completely level front-to-back and side-to-side.
Once the camper is leveled with the blocks in place, go ahead and lower the stabilizing jacks until they make contact with the ground (but don’t over tighten them). And that’s it! Your camper should now be properly leveled for a comfortable camping experience.
Camco T Level Installation
If you’ve ever had a hard time getting your RV or trailer level, Camco’s T Levels are here to help. Installation is quick and easy – simply place the levels on each corner of your RV or trailer and adjust until they’re level. Then, use the included chocks to secure your vehicle in place.
That’s it!
Now that your RV or trailer is level, you can enjoy your camping trip without worry. Thanks to Camco’s T Levels, leveling your vehicle is now a breeze.
How to Manually Level a Fifth Wheel
If you are having trouble with your fifth wheel not staying level, it is likely due to the fact that it needs to be manually leveled. This process is relatively simple and only requires a few tools.
First, you will need to find a level spot on which to park your RV.
Once you have found a suitable location, you will need to block up the front wheels of the RV so that it cannot move. Next, you will need to extend the leveling jacks on the RV until they make contact with the ground.
Once the jacks are in place, you can begin to adjust them until the RV is level from side to side and front to back.
To do this, simply turn each jack handle clockwise or counterclockwise until the desired level is achieved.
It is important to note that leveling a fifth wheel by hand can be time consuming and difficult. If possible, it is always best to use an automated leveling system.
However, if manual leveling is your only option, following these steps should help get your RV back into tip-top shape in no time!
Credit: www.crossroadsowners.com
Where Do You Put Bubble Levels on a Travel Trailer?
There are a few different places you can put bubble levels on a travel trailer. The most common place is on the tongue, near the coupler. You can also put them on the front or rear axle, or on the frame near the wheels.
When putting bubble levels on the tongue of your trailer, it’s important to make sure that the trailer is level side-to-side first. Then, check the front-to-back levelness by placing a level across the width of the tongue. Once you have both measurements, use leveling blocks under either end of the tongue until both measurements show that the trailer is level.
If you’re not able to get your trailer level using just the tongue bubble levels, you can try moving to another location such as one of the axles or frame rails. It’s often easiest to start at either end and work your way towards the middle until both sides measure equally.
Where is the Best Place to Put a Level on a Travel Trailer?
There are a few different ways that you can level your travel trailer. The most important thing is to make sure that the ground is level before you start. Here are a few different ways to level your travel trailer:
1. Use leveling blocks: Leveling blocks are great for getting your travel trailer level. They are easy to use and they work well on uneven ground. Simply place the leveling block under the corner of the travel trailer that is highest off the ground and then drive the trailer up onto the block.
This will raise up that corner of the trailer and help level it out. Repeat this process until all four corners of the trailer are raised up and level.
2. Use jacks: If you have jacks on your travel trailer, you can use them to help level it out.
Simply place the jack under one corner of the trailer and raise it up until the trailer is level. Repeat this process on all four corners until the entire trailer isleveled out.
3. Use a leveling system: Some travel trailers come with built-in leveling systems.
These systems usually have hydraulic jacks that automatically adjust to help level out your travel trailer when you arrive at your campsite.
How Do You Put a Level on a Camper?
Assuming you would like tips on how to level a camper:
The first thing you’ll want to do is find a spot that’s as level as possible. If you can, back the camper in so that you have more room to work with when leveling it.
Once you’ve found your spot and parked, put the camper into “park” and set the parking brake. Next, deploy your leveling jacks. These are usually located at the four corners of the camper.
For example, if your front right tire is higher than the others, lower the corresponding jack until it makes contact with the ground. Do this for all four corners until the camper feels level side-to-side and front-to-back.
If you don’t have leveling jacks or blocks, you can use milk crates or other sturdy objects to prop up one side of the camper until it’s level.
Just be sure whatever you use is stable and won’t collapse under the weight of the camper. Once everything is level, put chocks under all four tires to keep things from shifting while you sleep. And that’s it!
How Do You Use Rv Bubble Level?
If you have an RV, you know how important it is to keep it level. Not only does this make it more comfortable to live in, but it also helps to prevent wear and tear on the structure of your RV. One way to achieve this is by using a bubble level.
Here’s how:
First, find a flat surface on which to place your RV bubble level. This could be a driveway, parking spot, or even alevel campsite.
Place the bubble level on this surface and center it underneath your RV’s axle(s).
Next, check the spirit level to see if the bubbles are centered. If not, adjust the leveling blocks until they are.
Once the bubbles are centered, your RV should be level!
You can also use an electronic leveling system if you prefer. These work similarly to bubble levels, but use sensors instead of relying on human eyesight.
Some people find them more accurate and easier to use than traditional methods like bubble levels.
Camper Bubble Levels ~ How To Install ~
Conclusion
Are you ready to take your travel trailer out on the open road? Before you do, it’s important to make sure everything is in working order – that includes installing bubble levels on your trailer. Here’s a step-by-step guide on how to do just that:
1. Park your travel trailer on level ground and set the parking brakes.
2. Place a level across the top of the trailer tongue, making sure it’s perfectly horizontal. Use a tape measure to check the level from front to back, and then from side to side.
Adjust the tongue jack until the bubble is centered in the vial.
3. Next, place a level across the width of the trailer (perpendicular to the tongue). Check both sides to see if they’re even, and use shims or leveling blocks as needed to make adjustments.
Once again, check with a tape measure to be extra sure everything is level before moving on.
4. The final step is to check both rear corners of the travel trailer – one at a time – by placing a level diagonally across them. If necessary, use leveling blocks or jacks to raise or lower each corner until everything looks good and all four bubbles are centered in their respective vials.
Now you’re all set!