To tighten bearings on a bike, first remove the axle nut or quick release lever. Next, unscrew the dust cap if present and use a wrench to loosen the locknut. Apply some grease to the threads of the bearing adjustment screw and screw it in until it is tight.
Finally, retighten the locknut and replace the dust cap.
- Locate the bearings on your bike
- They are typically located on the wheels and at the bottom of the pedals
- Use a wrench to loosen the bolts that hold the bearings in place
- Remove the old bearings from your bike
- Clean any dirt or debris from the bearing seats with a clean cloth
- Place new bearings into the seats and hand-tighten the bolts to hold them in place
- Use a wrench to tighten the bolts securely, being careful not to over tighten them
Bicycle Wheel Bearings Maintenance
Bicycle wheel bearings are an important part of your bike’s overall performance. Proper maintenance of your bearings will ensure that your bike rides smoothly and efficiently. Here are some tips on how to keep your bicycle wheel bearings in top condition:
-Clean your bearings regularly with a dry cloth or brush. This will remove any dirt or debris that could potentially clog up the bearing and cause problems.
– Inspect your bearings regularly for signs of wear or damage.
If you notice any damage, replace the bearing immediately.
– Lubricate your bearings regularly with a quality grease or oil. This will help to reduce friction and protect the bearing from wear.
Cup And Cone Bearing Adjustment
Cone and cup bearings are a type of roller bearing, and are typically used in bicycles. The cone sits inside the cup, and both parts are usually made of steel. The cones and cups can be adjustable or fixed, depending on the design of the bicycle.
To adjust cone and cup bearings, first loosen the locknut that secures the bearing adjustment race. Next, use a wrench to turn the adjusting screw clockwise or counterclockwise to make adjustments. Finally, retighten the locknut to secure everything in place.
It’s important to keep these bearings clean and well-lubricated for smooth operation. If you hear creaking or grinding noises coming from your bottom bracket area, it’s likely that your cone and cup bearings need some attention!
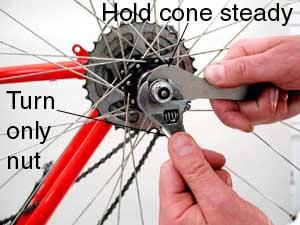
How to Tighten Rear Hub on Mountain Bike
If you’re like most mountain bikers, you probably don’t think much about your rear hub. But if it’s not properly tightened, it can cause some serious problems on the trail. Here’s a quick guide on how to tighten your rear hub:
1. First, remove the wheel from your bike and inspect the hub. Make sure that the axle is straight and that there is no play in the bearings.
2. Next, use a wrench to tighten the locknut on the non-drive side of the hub (the side without the cassette).
You want to be sure that this nut is tight enough so that there is no play in the hub, but not so tight that it makes it difficult to spin the wheel.
3. Once the locknut is tight, use a second wrench to hold onto the end of the axle while you tighten down the bolts on either side of the hub using a torque wrench. These bolts should be tightened to between 30 and 40 Newton meters (Nm).
Be careful not to overtighten them!
4. Finally, re-install your wheel and go hit those trails!
Bicycle Hub Cones
Bicycle hub cones are an essential part of any bicycle wheel. They provide support for the bearings, which allow the wheel to rotate freely. Without cones, the bearings would eventually wear out and the wheel would become difficult to turn.
There are two types of bicycle hub cones: adjustable and non-adjustable. Adjustable cones can be loosened or tightened, depending on how much play there is in the bearings. Non-adjustable cones are not meant to be adjusted and should only be replaced if they become damaged.
Most bicycles have ball bearings in their hubs. The balls sit in races (grooves) in both the cone and the cup (the fixed inner race). When everything is tight and smooth, the friction between these parts is very low and the wheel spins easily.
Over time, however, dirt and grit can work their way into the races and start to cause problems.
If you feel your wheels starting to bind or resist turning, it’s probably time to adjust or replace your cones. First, check that all of the parts (balls, races, etc.) are clean and free of damage.
Then spin each wheel slowly by hand while feeling for any roughness or resistance. If everything feels smooth, then your problem is likely with something else on your bike (like a seized brake pad). But if you feel any binding or resistance, then it’s time to take a closer look at your hub cones!
How Tight Should Bike Cones Be
Bike cones are an important part of keeping your bike in good working order. But how tight should they be?
There are two main types of bike cones: those that go around the axle nuts and those that go around the hub bearings.
Each type has its own torque specification that must be followed to ensure proper function and longevity of your bike components.
Axle nut cones should be torqued to 30-60 in-lbs (3.4-6.8 Nm). Most axle nut cone kits will come with a wrench that will have the correct size hex bit to fit the bolts on your particular bicycle.
If you don’t have one of these wrenches, you can usually find them at your local bike shop. Just make sure to bring along the specific measurements of your axle nuts so they can help you choose the right size hex bit.
Hub bearing cones should be torqued to 60-80 in-lbs (6.8-9 Nm).
These are usually much easier to find a wrench for since most standard socket sets will have an appropriate size metric socket or allen key/wrench for this task. You may need a longer allen key/wrench if your hub has recessedbolts or is otherwise difficult to reach with a standard length tool. Again, it’s always best to bring along the specific measurements of your hub bearings when shopping for a torque wrench or allen key/wrench set so you can get the right size tools for the job.
Credit: www.parktool.com
How Do You Tighten Front Wheel Bearings on a Bike?
Most front wheel bearings on a bike are cartridge bearings, which means that the entire bearing unit can be removed and replaced as a single piece. To remove the old bearings, first remove the axle nut or quick release skewer, then unscrew the locknut that holds the bearing in place. With the locknut removed, you should be able to pull out the old bearings.
To install new bearings, start by lightly greasing the inside of the hub where the bearings will sit. Then press one of the new bearings into place until it is flush with the edge of the hub. Next, screw on a locknut (finger-tight) and thread on an axle nut or quick release skewer (also finger-tight).
Finally, use a wrench to tighten down both nuts alternately until they’re snug against each other (but don’t overtighten!).
How Do You Tighten Loose Bearings?
There are a few ways to tighten loose bearings. The most common is to use a crescent wrench or socket and ratchet to turn the retaining nut clockwise until it is tight. You may need to use an adjustable wrench if the space is tight.
Another way is to use two wrenches of the same size, one on the bearing retainer nut and one on the lock washer. This will keep the lock washer from turning and allow you to tighten the nut.
How Tight Should Bike Bearings Be?
Bike bearings are an important part of your bike’s overall performance. They help to keep the wheels spinning smoothly and evenly, which in turn makes for a better ride. But how tight should they be?
The answer to this question depends on a few factors, including the type of bike you have and the conditions you ride in. For example, if you have a mountain bike that you take out in all kinds of weather, you’ll want to make sure your bearings are tighter than if you have a road bike that you only ride on sunny days.
In general, though, it’s best to err on the side of caution and go for slightly tighter rather than slightly looser bearings.
This will help to ensure that your wheels keep spinning smoothly even when things get tough out on the trail or road.
Of course, it’s always important to follow the manufacturer’s recommendations when adjusting your bike bearings. And if you’re ever unsure about what to do, just ask your local bike shop for advice.
They’ll be happy to help ensure that your bearings are just right for your particular bike and riding style.
How Do You Tighten Axle Bearings?
If your car has loose axle bearings, it will likely need to be repaired by a mechanic. However, if you catch the problem early enough, you may be able to tighten the bearings yourself and avoid an expensive repair bill. Here’s how to do it:
1. Jack up the car and remove the wheel. 2. Unscrew the bearing cap from the hub using a wrench or socket set. 3. Remove the old bearings from the hub with a punch or similar tool.
4. Clean out any debris or dirt from inside the hub with a rag or brush. 5. Insert new bearings into the hub (be sure to grease them first). 6. Screw on the bearing cap tightly and lower the car back down onto its wheels.
With these simple steps, you can tighten axle bearings and keep your car running smoothly for many miles to come!
How to Fix a Loose Wheel Bearing on a Bike
Conclusion
This blog post was very informative and helpful. It provided clear instructions on how to tighten bearings on a bike, which can be a tricky process. The author also gave some tips on how to maintain bearinsgs so that they last longer.
Overall, this was a great post for anyone who is looking to learn more about bikes or for someone who needs a refresher on how to tighten their own bike’s bearings.