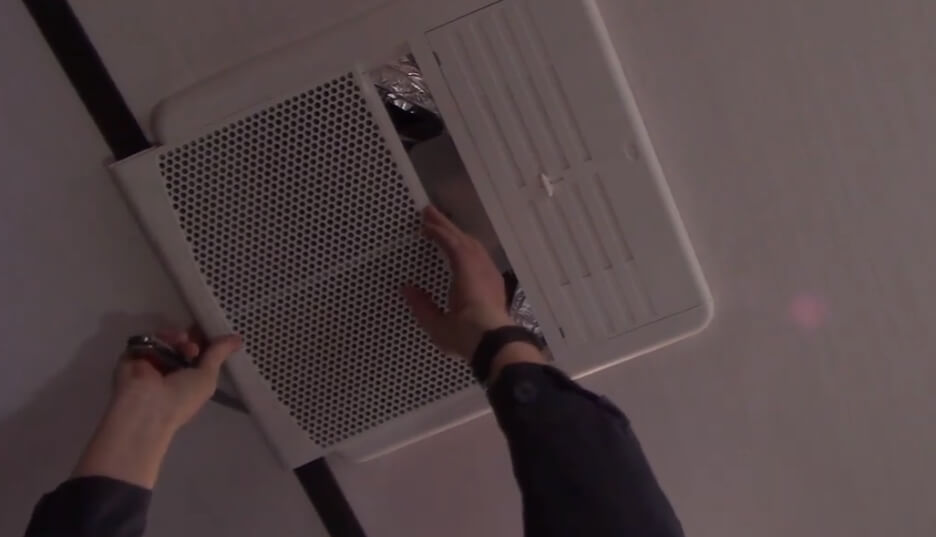
To remove the Dometic AC inside cover, first disconnect the power. Next, unscrew the four screws that hold the cover in place. Gently pull the cover away from the unit, being careful not to damage any of the wires or components.
Finally, replace the cover and screw it back into place.
- Begin by unplugging the power cord from the RV
- Next, locate the screws that hold the inside cover in place and remove them
- Once the screws are removed, carefully lift off the inside cover to access the evaporator coils
- Use a soft brush or cloth to gently remove any dust or debris from the coils
- Finally, replace the inside cover and screw it back into place before plugging the power cord back in and restoring power to the RV
Dometic Duo Therm Inside Cover
If you have a Dometic Duo Therm RV air conditioner, you know that it’s a great way to keep cool on those hot summer days. But did you know that there is an inside cover for your AC unit? This cover helps to protect the inner workings of your AC unit from dust and debris.
It’s a great way to keep your AC unit in tip-top shape!
How to Remove Rv Ac Cover
As the weather gets warmer, many of us are preparing to take our RVs out for a spin. But before you hit the open road, there’s one important maintenance task you should do: clean your RV’s air conditioner (AC) unit.
The AC unit is located on the roof of most RVs, and it’s easy to forget about it until you need it on a hot day.
But if you don’t clean it regularly, dirt and dust can build up and clog the unit, making it less effective at cooling your RV.
Here’s how to clean your RV AC unit in a few simple steps:
1. Start by removing the AC cover.
This will give you access to the fins and coils inside the unit.
2. Use a soft brush or compressed air to gently remove any dirt or debris from the fins and coils. Be careful not to bend or damage the fins while you’re cleaning them.
3. Once the fins and coils are clean, replace the AC cover and tighten all screws or bolts securely.
4. That’s it! Now your RV AC unit is ready for action this summer!
How to Replace a Ducted Rv Air Conditioner
If your RV is starting to show its age, one of the first things that may need replacing is the air conditioner. Ducted RV air conditioners are relatively easy to replace if you have a little bit of experience with home improvement projects. Here’s a step-by-step guide to help you through the process:
1. Start by turning off the power to the RV at the circuit breaker. You don’t want to be working with live wires!
2. Next, remove the old air conditioner unit by unscrewing it from the ceiling or wall mounts.
If there are any ducts attached to the unit, carefully disconnect them and set them aside.
3. Now it’s time to install the new air conditioner unit. Follow the instructions that come with your new unit, and be sure to securely mount it in place.
If there are any ducts involved, now is the time to reconnect them.
4. Once everything is in place, turn on the power at the circuit breaker and test out your new air conditioner!
Dometic Rv Air Conditioner
RV air conditioners are one of the most important parts of an RV. They keep us cool in the summer and warm in the winter. But what exactly is a RV air conditioner?
How does it work? And how do you maintain it?
A RV air conditioner is basically a mini-split system, which means it has two main parts: an outdoor unit and an indoor unit.
The outdoor unit contains the compressor, condenser, and expansion valve. The indoor unit contains the evaporator and blower fan. These units are connected by refrigerant lines.
The compressor pumps refrigerant through the system. The refrigerant absorbs heat from the inside of the RV as it passes through the evaporator coils. The now-hot refrigerant then goes to the outdoor unit where it releases its heat through the condenser coils.
This process continues until the desired temperature is reached inside the RV.
Maintaining your RV air conditioner is relatively simple. Make sure to keep the area around your AC clean and free of debris.
Every few months, inspect your AC for any signs of damage or leaks. If you notice anything unusual, contact a qualified technician for assistance.
Dometic Air Distribution Box Removal
If you need to remove your Dometic air distribution box, there are a few things you need to know. First, make sure that you have turned off the power to the unit. Next, locate the four screws that hold the box in place.
These screws are located at the corners of the box. Once you have located these screws, use a screwdriver to remove them.
Now that the screws are removed, you can gently pull the box away from the wall.
Be careful not to damage the wires that are attached to the back of the box. Once you have removed the box, you will be able to access all of the components inside.
Credit: www.smartacsolutions.com
How Do I Remove My Ac Cover?
Assuming you want tips on how to remove an AC cover:
First, find the screws or bolts that are holding the cover in place. In most cases, there will be four of them.
Unscrew or unbolt these, and set the cover aside. If your AC unit doesn’t have any screws or bolts holding the cover in place, it may be clipped on – in which case, gently pry it off.
Next, take a look at the filter.
It’s likely located behind the front grille (the part with all the slats). Remove this grille by unscrewing the screws or bolts that are holding it in place (again, there will probably be four of them). Once you’ve done this, you should be able to access the filter.
To remove the old filter and insert a new one:
– Gently pull out the old filter and dispose of it properly.
– Take your new filter and hold it up to where the old one was located; make sure that it is facing in the same direction as the old one was.
– Insert your new filter into place and reattach the grille using screws or bolts (tighten these until they’re snug but don’t overdo it).
– Put your AC unit’s cover back on using screws or bolts (again, tighten these until they’re snug but don’t overdo it) – and that’s it!
Can I Run My Rv Ac Without the Shroud?
No, you cannot run your RV AC without the shroud. The shroud helps to protect the AC unit from debris and weather elements. It also helps to keep the AC unit cool by providing airflow around it.
How Do I Know Which Dometic Ac Model I Have?
Dometic AC units are one of the most popular brands on the market, and for good reason. They offer a wide variety of models to choose from, so finding the perfect unit for your RV can be a bit daunting. But don’t worry, we’re here to help!
In this blog post, we’ll explain how to determine which Dometic AC model you have.
The first step is to find the serial number of your unit. This can usually be found on a sticker or plate on the back or side of the AC unit.
Once you have the serial number, you can use it to look up the model number in Dometic’s online database.
If you don’t have access to the internet, or if you prefer not to use Dometic’s online database, you can also identify your AC unit by its physical characteristics. The most important thing to look for is the BTU (British Thermal Unit) rating.
This will be printed on a label somewhere on the unit, and it will tell you how much power the unit has. Higher BTU ratings mean more powerful units, so if you’re not sure which model you have, this is a good place to start.
Once you know your BTU rating, take a look at Dometic’s charts that list each model by its BTU rating (you can find these charts online or in their manuals).
If your unit falls within one of these ranges, then that’s your model! If not, don’t worry – there are other ways to narrow it down.
Another way to ID your Dometic AC unit is by its dimensions.
Each model has slightly different dimensions (height/width/depth), so measuring yours and comparing it to Dometic’s specifications can help narrow down which model you have.
Finally, another clue that can help identify your Dometic ACunit is its color scheme. While most units are white with blue accents, some models were produced in all-white or all-black variants.
Comparing photos of different models online can help give you an idea of what yours should look like.
We hope this blog post was helpful in identifying which Dometic ACmodel you have!
How Do You Remove Ac Cover from Wall?
If your AC cover is mounted on the wall, you will need to remove it before you can clean or replace the filter. To do this, first locate the two screws that hold the cover in place. Then, using a Phillips head screwdriver, remove the screws and set them aside.
Next, gently pull the cover away from the wall until it comes off completely. Once the cover is off, you can proceed with cleaning or replacing the filter.
Dometic AC Remove and Replace
Conclusion
Assuming you would like a summary of the blog post titled “How to Remove Dometic Ac Inside Cover”:
The author begins by stating that they were trying to remove the inside cover of their Dometic AC unit, but were struggling. They couldn’t find any screws or anything holding it in place.
They eventually figured out that there are two metal clips on either side near the front that need to be pushed inwards in order to release the cover. Once those are pushed in, the cover can be easily removed.