To put in snow stakes, start by finding an area where you want to place the stake. Then, drive the stake into the ground with a hammer. Make sure that the stake is driven in at least 6 inches so that it will be secure.
Once the stake is in place, tie a string around it and attach it to a marker so that you know where the stake is located.
- Decide where you want to put your snow stakes
- Push the stake into the ground until it is secure
- Attach a string or ribbon to the top of the stake
- Hang a sign, balloon, or other decoration from the string
Snow Stake Install Tool
Assuming you would like a blog post discussing the Snow Stake Install Tool:
The Snow Stake Install Tool is a great way to make sure your snow stakes are installed correctly and quickly. This tool can be used on any type of ground, including concrete, asphalt, or even dirt.
It is easy to use and makes installing your snow stakes a breeze. Simply insert the tool into the ground where you want your stake to go, and push down. The tool will do all the work for you, making sure the stake is installed correctly and at the correct depth.
You can then remove the tool and move on to the next location.
Installing snow stakes can be a tedious and time-consuming task, but with this install tool, it’s a snap! This is a must-have for anyone who needs to put in snow stakes on a regular basis.
Whether you’re a professional landscaper or just someone who wants to keep their driveway clear this winter, this install tool will save you time and hassle.
How to Put Driveway Markers in Frozen Ground
One of the most frustrating things during winter is dealing with ice buildup on your driveway. Not only is it a pain to shovel, but it can also be dangerous if you don’t take proper precautions. One way to help prevent ice buildup is to install driveway markers.
Driveway markers are usually made of plastic or metal and are placed along the edges of your driveway. They help to reflect light and make it easier for drivers to see the edge of the road at night.
Installing driveway markers is relatively simple, but there are a few things you need to keep in mind when doing so.
First, make sure that the ground is frozen solid before attempting to install them. If not, they will simply sink into the ground and become useless. Second, use a hammer or mallet to lightly tap the marker into place; do not try to force them as this could damage them.
Finally, be sure to place them far enough apart so that they are visible from both sides of the road – about one foot apart should suffice.
With these tips in mind, installing driveway markers is a breeze! Not only will they help keep your family safe this winter, but they’ll also make it easier for visitors or delivery drivers to find your home.
Driveway Marker Drill Bit
If you have a driveway marker that needs to be installed, then you will need a driveway marker drill bit. This type of drill bit is designed for use with concrete and asphalt surfaces. It is important to choose the correct size drill bit for the job.
The most common sizes are 1/2 inch and 3/4 inch.
The first step is to determine where you want to place the driveway marker. Once you have decided on the location, mark it with a piece of chalk or tape.
Next, measure the depth of the hole that you will need to drilled. The average depth for a driveway marker is 4 inches. Add 1/2 inch to this measurement so that there is room for the anchor system.
Now it’s time to drill the hole. Start by drilling a pilot hole using a small diameter drill bit. Then switch to the larger diameter drill bit and continue drilling until you reach the desired depth.
Finally, remove any loose debris from the hole using a vacuum cleaner or brush attachment on your drill.
Diy Driveway Markers
When it comes to driveway markers, there are a few different options that you can choose from. You can either buy them or make them yourself. If you decide to make your own, there are a few things that you will need to keep in mind.
First of all, you need to make sure that the materials that you use are durable and weather resistant. This is especially important if you live in an area where the winters are harsh. You also want to make sure that the marker is visible from both the street and your house.
One option for making your own driveway marker is to use PVC pipe. You will need to cut the pipe into equal lengths and then drill a hole through the center of each one. Once this is done, you can then thread a rope or cord through each hole.
The next step is to tie each end of the rope or cord securely so that it doesn’t come undone. Finally, you will need to add reflective tape to each side of the PVC pipe so that it is visible at night.
Another option for making your own driveway marker is to use wood stakes.
You will need to drive the stake into the ground at an angle so that it points towards your house.
How to Install Driveway Reflectors
Driveway reflectors are an important safety feature for any home. They help to increase visibility at night, making it easier for drivers to see the edge of the driveway and avoid running off into the grass or dirt. Reflectors are especially useful in areas where there is no street lighting.
Installing driveway reflectors is a simple process that anyone can do. The first step is to purchase the reflectors from a hardware store or online retailer. Next, clean the area around the edge of the driveway with soap and water to remove any dirt or debris.
Once the area is clean, apply a generous amount of adhesive to the back of each reflector. Press the reflectors firmly into place along the edge of the driveway. Allow 24 hours for the adhesive to cure before driving over them.
That’s all there is to it! By following these simple steps, you can add an extra layer of safety to your home’s driveway.
Credit: www.homedepot.com
How Do You Install Snow Stakes?
If you live in an area that gets a lot of snow, then you know how important it is to have good snow stakes. Snow can cause all sorts of problems, from damaging your roof to making it difficult to get around outside. But with the right snow stakes, you can help prevent these problems.
Here’s how to install them:
1. Drive the stake into the ground at a 45 degree angle, about 2 feet away from the edge of your driveway or walkway. Make sure that the stake is driven in deeply enough so that it won’t be pulled out easily by the weight of the snow.
2. Tie a length of rope or twine to the top of the stake, and then run it along the ground to where you want the other end to be anchored. This could be another stake driven into the ground, or something like a fence post or tree trunk.
3. Once you have your anchor point secured, tie off the rope or twine so that it is nice and tight.
You don’t want there to be any slack in the line, as this could cause problems when the snow starts falling and accumulating on it.
4. Repeat steps 1-3 for each additional snow stake that you need to install.
That’s all there is to it!
With your snow stakes in place, you can rest assured knowing that your property will be better protected against heavy winter weather conditions.
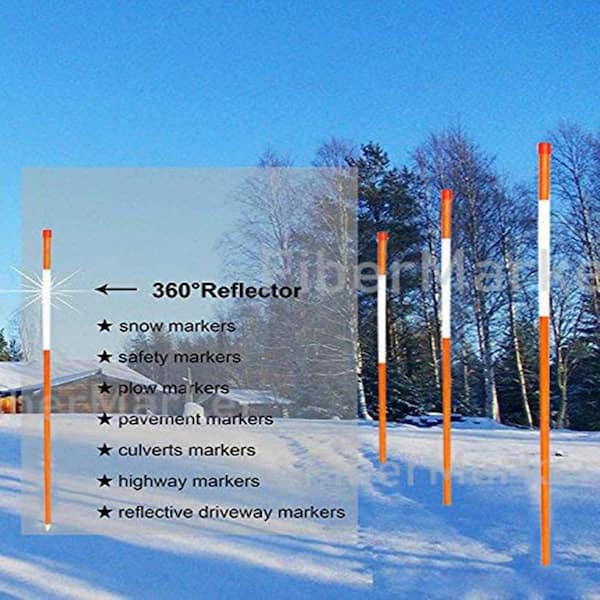
How Do You Install Snow Markers on a Driveway?
Assuming you would like tips on how to install snow markers on a driveway:
Tools and Materials Needed:
-shovel or spade
-tape measure or ruler
-chalk line or string level
-marking paint or brightly colored duct tape (optional)
-snow markers (plastic, metal, wood, or recycled materials)
Instructions:
1. shovel a path from your driveway to where you want the markers to be placed.
This will make it easier to carry the markers and supplies to the installation area. If there is already a path in place, clear any debris that may be present.
2. use a tape measure or ruler to determine the placement of your snow markers.
It is important to have an even spacing between each marker. Once you have determined the placement, use a chalk line or string level to mark where each marker will go. You can also use marking paint or brightly colored duct tape at this stage if desired.
3. drive the stakes of your snow markers into the ground along the marked lines. Make sure they are driven in securely so they do not fall over when weighted down with snowfall. If using plastic markers, insert them into their stands before placing in the ground.
4. enjoy your newly installed snow markers!
How Far Apart Should Snow Stakes Be Placed?
Assuming you are referring to measuring the depth of snow, snow stakes should be placed every 10-20 feet, depending on the accuracy you desire. Stake placement is also important for predicting avalanches and measuring snowfall. Generally, avalanche forecasters place their stakes closer together (around 10 feet) while those measuring snowfall might place theirs farther apart (up to 20 feet).
How Do You Get Driveway Markers in the Ground?
There are a few ways to get driveway markers in the ground. One way is to use a hammer and drive the marker into the ground. Another way is to use a power drill with a screwdriver attachment to screw the marker into the ground.
The third way is to use a hand-held auger to dig a hole for the marker and then insert it into the hole.
HOW TO INSTALL PLOW STAKES THE FAST AND EASY WAY | WE ARE WAY BEHIND!
Conclusion
Whether you’re prepping your home for a winter storm or simply trying to keep your driveway clear of snow, putting in snow stakes can be a helpful way to achieve your goal. Snow stakes are designed to help direct the flow of snow away from areas where you don’t want it, making it easier to shovel or plow. They can also help prevent damage to landscaping and other property.
If you live in an area that gets a lot of snow, investing in some good quality snow stakes is a smart idea. Here’s how to put them in:
1. Start by finding an appropriate location for your snow stake.
You’ll want to choose an area that is close enough to the edge of your driveway or sidewalk so that the stake will be effective, but not so close that it will get in the way when you’re shoveling or plowing.
2. Once you’ve selected a spot, use a hammer or mallet to drive the stake into the ground. Be sure to pound it in firmly so that it doesn’t come loose during a storm.
3. Repeat this process until you have as many stakes as you need (usually 1-2 per foot).
4. Finally, attach some brightly colored ribbon or flags to the top of each stake so that they are visible in the snow and won’t get knocked over easily.