Last Updated on December 10, 2022 by tawhid
If you’re one of the many people who’ve been lucky enough to get their hands on a Starlink dish, congratulations! You’re about to have some of the fastest, most reliable internet available. But before you can start using it, you need to know how to properly mount your dish.
Here’s a quick guide on how to do just that:
First, find a level spot where you want to mount your dish. It’s important that the dish is mounted as level as possible, so take your time in finding the right spot.
Once you’ve found the perfect location, use a drill to make four pilot holes in the ground (two in front of the dish and two behind it). Next, use lag bolts to secure the mounting bracket to the pilot holes.
- The first step is to find a level spot on your roof or in your yard where you want to mount the Starlink dish
- Use a tape measure to find the center point of the area you have chosen, and make a mark with chalk or spray paint
- Place the mounting bracket on the ground at this point, making sure that it is level
- Drive the provided lag bolts into the bracket, using a socket wrench if necessary, until they are tight against the bracket
- Take the assembled dish and place it over the top of the bracket, lining up the holes in its base with those in the bracket
- Screw in each of the provided screws until they are tight against both sides of the dish base
Diy Starlink Pole Mount
If you’re a Starlink customer, you know that one of the most important things you need for your service is a good mount. But what if you don’t have a lot of money to spend on a commercial mount? Or what if you live in an area where it’s difficult to find a place to put your dish?
In this post, we’ll show you how to make your own DIY Starlink pole mount.
First, let’s talk about what you’ll need. For this project, you’ll need:
-A length of PVC pipe (we used 1″ diameter PVC)
-PVC connectors (elbows and tees will work)
-PVC glue
-A drill with a long bit (we used 1/2″ diameter)
-A saw (to cut the PVC)
-Measuring tape or a ruler
-Starlink Satellite Dish
Now that we have all of our materials, let’s get started!
The first step is to measure and cut your PVC pipe.
You’ll want four pieces that are 24 inches long, and two pieces that are 12 inches long. Once those are cut, use your elbows and tees to connect the pieces into two rectangles – these will be the sides of your mount.
Next, take one of the rectangles and mark out where you want your dish to go.
Drill four holes at each corner, making sure they’re big enough for the bolts on your dish to fit through.
Now it’s time to assemble everything! Glue your pipes together according to the diagram below, making sure that the rectangle with the drilled holes is at the top. Let everything dry overnight before moving on to the next step.
The last step is to attach your dish! Place it on top of the rectangular frame and bolt it down. Run your coaxial cable through one of the side openings and plug it into your receiver. That’s it – now you’re ready to enjoy satellite TV!
Starlink Pole Mounting Kit
If you’re one of the many people who’ve been eagerly awaiting the arrival of SpaceX’s Starlink satellite internet, then you might be wondering how you’re going to mount all those dishes. Well, wonder no more! The Starlink Pole Mounting Kit has everything you need to get your system up and running.
The kit includes four poles that are each 6 feet tall, as well as a mounting plate and all the necessary hardware. It’s easy to assemble and can be done in just a few minutes. Plus, the entire system is made from weather-resistant materials, so you don’t have to worry about it rusting or corroding over time.
Once your poles are installed, simply attach the dish (sold separately) to the mounting plate and point it in the direction of the sky. That’s it! You’ll be able to start enjoying fast, reliable satellite internet in no time.
Starlink Mount Options
One of the many great things about Starlink is that it offers a variety of mount options to suit your needs. Whether you want a permanent installation or something more temporary, there’s a mount option for you. Let’s take a look at the different types of mounts available:
Permanent Mounts: These mounts are designed for those who want a more permanent installation. They’re made from sturdy materials and can be installed on any level surface. There are several different types of permanent mounts available, so be sure to choose the one that best suits your needs.
Semi-Permanent Mounts: These mounts are perfect for those who want an installation that’s not quite as permanent as a permanent mount. They’re usually made from lighter materials and can be easily removed if needed. Semi-permanent mounts are a great option if you’re not sure where you want to install your Starlink system or if you plan on moving it around in the future.
Portable Mounts: Portable mounts are exactly what they sound like – they’re designed to be portable! They’re often small and lightweight, making them easy to take with you wherever you go. If you plan on using your Starlink system while traveling, a portable mount is definitely the way to go.
J Mount for Starlink
If you’re looking to install a J Mount for your Starlink satellite dish, you’ve come to the right place. In this blog post, we’ll provide detailed instructions on how to do just that.
First, let’s start with a few basics.
The J Mount is a popular mounting option for satellite dishes, as it provides a sturdy and reliable way to keep your dish in place. It’s also relatively easy to install, which makes it a great choice for those who are new to the world of satellite dishes.
To begin, you’ll need to gather a few tools and materials.
First, you’ll need a drill and some screws (we recommend using 3/8″ or 1/2″ screws). You’ll also need something to use as a level, such as a spirit level or laser level. Finally, you’ll need the actual J Mount itself – you can purchase one online or at most hardware stores.
Once you have all of your materials gathered, it’s time to get started with the installation process. Begin by finding an appropriate location for your dish – somewhere that is clear of any obstructions and receives direct sunlight. Once you’ve found the perfect spot, use your drill to screw the mount into place.
Be sure to use the leveler tool before tightening each screw so that your mount is perfectly level – this will ensure optimal performance from your satellite dish.
That’s it! Once your mount is installed, simply attach your satellite dish according to the manufacturer’s instructions and enjoy crystal-clear TV reception from space!
Starlink Mount Adapter
In order to use Starlink with a telescope, you will need the Starlink Mount Adapter. The adapter allows you to connect your iPhone or iPod touch to the mount, so you can control it wirelessly.
The Starlink Mount Adapter is made of aluminum and plastic, and it weighs just over 1 ounce.
It is 4.5 inches long and 2.75 inches wide. The adapter has a standard tripod screw mount on one end, and a Lightning connector on the other end. There is also a small plastic piece that fits over the Lightning connector to keep it from being damaged when not in use.
To use the adapter, simply screw it into the bottom of your telescope mount. Then connect your iPhone or iPod touch to the adapter using the Lightning cable that came with your device. Once connected, you will be able to control your telescope using the Starlink app.
Credit: nerdtechy.com
Can I Mount My Starlink Dish on a Pole?
Yes, you can mount your Starlink dish on a pole. You will need to purchase a separate mounting kit for this, which can be found online or at your local hardware store. Once you have the mounting kit, follow the instructions that come with it to attach the dish to the pole.
Make sure that the pole is firmly planted in the ground and that it is not going to fall over. Also, make sure that the dish is pointing in the right direction so that it can receive a strong signal from space.
How Do You Anchor a Starlink Dish?
If you want to receive internet service from Starlink, you will need to have a dish installed. Let’s go over the steps on how to anchor your Starlink dish.
The first step is to find a level spot on your property that has good line of sight to the sky.
Once you have found a spot, use a tape measure to mark out a circle that is 10 feet in diameter. This will be the area where you will install your dish.
Next, use a shovel or auger to dig holes around the perimeter of the circle.
The holes should be about 18 inches deep. Once all of the holes are dug, insert anchors into each hole and then fill the holes with concrete. Allow the concrete to cure for 24 hours before proceeding to the next step.
Now it’s time to install the mast onto which the dish will be mounted. First, insert the base of the mast into the center of the concrete pad. Then, using guy wires and turnbuckles, secure the mast in place by attaching it to each ofthe anchors around the perimeter ofthe pad.
Oncethe mast is secure, you can now attachthe dishto it. Start by attachingthe LNB (low noise block converter)tothe armofdishusing themounting screws provided in your kit. Next, connect one endofcoaxial cableto portINPUTon backofthe LNB and run cable up throughtubeincenterofthe mountandsecurewithclampprovidedinthe kit(make surecableisnot kinkedorpinched).
Attachother endofcoaxial cabletotheOUT portonbackofmodem/router unitandscrewonRFconnectorbyhandtocompleteconnection(do not overtighten). Finally, pointdishtowardsthesatellitepositionedoverheadusingazimuthand elevationadjustmentknobsuntilyouhaveachievedamaximumsignal strength(as indicatedbylightsonfrontofmodem/routerunit).
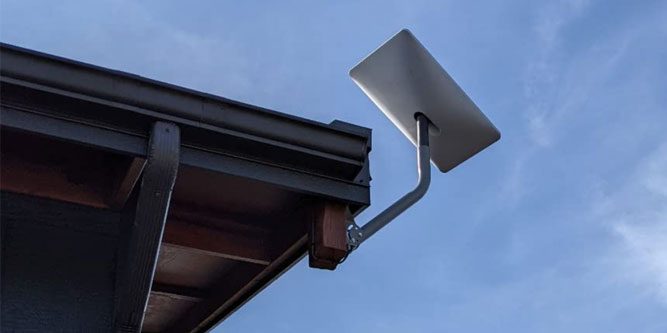
How Do You Install Starlink Dish on Roof?
To install your Starlink dish, you’ll need to find a spot on your roof that has a clear view of the sky. Once you’ve found a suitable location, use the included mounting bracket to attach the dish to your roof. Then, connect the dish to your modem using the provided Ethernet cable.
Finally, point the dish towards the sky and wait for it to connect to SpaceX’s satellite network.
Where Should I Mount My Starlink Dish?
If you’re wondering where to mount your Starlink dish, there are a few things to keep in mind. First, the dish needs a clear view of the sky and should be installed as close to ground level as possible. Second, make sure there are no obstructions (trees, buildings, etc.) between the dish and the sky.
Third, the dish should be mounted on a solid surface (e.g., concrete or metal) that can support its weight. fourth The angle at which the dish is mounted is important for optimal performance; Starlink recommends an angle of 30-45 degrees from horizontal. Finally,Starling dishes must be connected to an power outlet via an Ethernet cable; they cannot be battery-powered.
When it comes to where to mount your Starlink Dish, following these guidelines will ensure optimal performance:
The Dish needs a clear view of the Sky with no Obstructions
It should be close to Ground Level
Mounted on a Solid Surface that can support its weight
Starlink Satellite Internet: Installation demo and tips
Conclusion
Assuming you would like a summary of the blog post titled “How to Mount a Starlink Dish”, here it is:
The author begins by discussing the tools and materials needed for the job, which include a drill, a screwdriver, wall anchors, screws, and of course the Starlink dish. They also recommend having someone on hand to help with the mounting process.
Next, they go over the steps for actually mounting the dish. First, you’ll need to find a suitable location – one that’s away from trees or other obstacles. Then, using the provided template as a guide, drill four holes in your chosen location.
Next, insert wall anchors into two of the holes and screws into all four. Finally, attach the dish to the screws/anchors and tighten everything down.
The author finishes up by offering some tips for aligning your dish once it’s mounted.
All in all, it’s not a difficult process – just be sure to take your time and double-check your work before calling it done.