Last Updated on August 7, 2023 by tawhid
Pump your tires to the correct psi before heading out on your road bike. Most road bikes have a range of 30-60 psi. To find out what pressure is best for you, consult your owner’s manual or the tire manufacturer’s website.
Once you have the right pressure, use a frame pump or mini pump to inflate your tires. If you don’t have a pump with you, stop at a gas station and use their air compressor.
- If you have a pump with a frame-mount, start by attaching it to your bike
- Secure the hose to the valve stem, then thread on the nozzle and tighten it clockwise
- Hand-tighten the thumb lock as well
- Now give the pump a few good strokes to fill up the barrel with air
- Unscrew the nozzle and release the air into your tire until it reaches the desired pressure
Bike Frame Pump
A bike frame pump is a handheld air pump that is designed to fit onto the frame of your bicycle. The pump is usually made from aluminum or steel and has a handle that you can grip while pumping. The air hose of the pump attaches to the valve on your bicycle tires and provides air pressure to inflate them.
There are many different brands and styles of bike frame pumps available on the market, so it is important to choose one that will best suit your needs. If you frequently ride in rough terrain, then you may want a sturdier pump that can withstand more wear and tear. If you only ride occasionally, then a lighter weight pump might be sufficient.
You should also consider the size of the tires on your bicycle when choosing a bike frame pump since some models are designed for specific tire sizes.
Most bike frame pumps will come with instructions on how to use them, but here is a basic overview: first, open up the valve on your tire by unscrewing the cap. Next, attach the air hose of the pump to the valve and begin pumping until desired inflation is reached (usually around 30-60 PSI).
How to Attach Bike Pump to Valve
Assuming you would like a blog post discussing how to properly attach a bike pump to a valve:
It is important to know how to properly attach a bike pump to a valve in order to ensure that you are able to effectively pump air into your tires. There are two main types of valves that are commonly found on bicycles – Presta and Schrader.
Here is a quick guide on how to attach your bike pump to each type of valve:
Presta Valve:
1. Unscrew the cap at the top of the Presta valve and make sure that there is no dirt or debris inside the valve stem.
2. Insert the tip of the pump into the hole at the center of the valve stem. You may need to apply some pressure in order for it to fit snugly.
3. Once the pump is attached, begin pumping air into your tire until it reaches your desired PSI (pounds per square inch).
Make sure not to over-inflate as this can cause damage to your tire!
4. When you are finished inflating, unscrew the pump from the valve stem and screw the cap back onto the top of the valve. This will help prevent any air from escaping.
Pump for Road Bike
If you’re an avid road cyclist, then you know that a good pump is essential for keeping your tires inflated and in good shape. A road bike pump is designed to quickly and easily inflate your tires, so you can keep pedaling along the open road. There are many different types of road bike pumps on the market, so it’s important to choose one that will fit your needs and riding style.
Here’s a look at some of the most popular types of road bike pumps:
– Mini Pumps: Mini pumps are small, lightweight, and easy to carry with you on your rides. They’re ideal for cyclists who don’t want to lug around a larger pump, and they’re also great for emergency situations when you need to quickly inflate a tire.
Most mini pumps can’t handle high-pressure tires, so they’re not ideal for riders who use tubeless tires or those who ride long distances.
– Floor Pumps: Floor pumps are larger than mini pumps and require more effort to use, but they can inflate your tires much faster. They’re perfect for riders who have multiple bikes with different tire sizes, as most floor pumps come with interchangeable nozzles.
Many floor pumps also have built-in pressure gauges, so you can always check to see if your tires are properly inflated.
– CO2 Inflators: CO2 inflators are small devices that use disposable cartridges of carbon dioxide gas to quickly inflate your tires. They’re very convenient because they don’t require any extra pumping effort from you – just attach the cartridge and let the gas do its job!
However, CO2 inflators can be expensive, and the cartridges can run out quickly if you have multiple flats on a ride.
How to Attach Bike Pump to Presta Valve
If you’re a cyclist, then you know how important it is to keep your tires inflated. But if you don’t have a good bike pump, then it can be difficult to get the job done. In this blog post, we’ll show you how to attach a bike pump to a Presta valve so that you can get your tires inflated in no time.
First, remove the cap from the Presta valve. Next, unscrew the nut that’s holding on the valve stem. Once the nut is removed, you should be able to pull out the valve stem.
Now, take your bike pump and place the nozzle over the hole in the Presta valve. Make sure that the nozzle is snug against the side of the hole so that no air will escape when you start pumping.
Once everything is in place, start pumping away!
You should see your tire start to inflate after just a few pumps. When you’re finished inflating your tire, screw on the nut to secure the valve stem in place and replace the cap on top of the Presta valve.
Blackburn Frame Pump Instructions
Assuming you would like instructions on how to use the Blackburn Frame Pump:
1. To start, make sure that the pump head is screwed on tightly.
2. Open the valve on your tire by unscrewing it counter-clockwise.
3. Place the barrel of the pump onto the valve and make sure that it is secure. If it is not, air will escape and you will have to start over.
4. Once the pump is locked onto the valve, begin pumping by pushing down on the handle and then pulling up.
You should feel resistance as you do this – if you don’t, Air is escaping and you need to check that the pump is properly secured onto the valve again.
5. Continue pumping until your tire is at its desired pressure level.
Credit: www.bikeroar.com
Where Do You Put the Pump on a Road Bike?
There are two main types of road bike pumps: frame-mounted pumps and floor pumps. Frame-mounted pumps are small, lightweight and can be attached to your bike frame. Floor pumps are larger, more powerful and can inflate tires faster.
To use a frame-mounted pump, first remove the valve cap from your tire and unscrew the Presta or Schrader valve. Next, firmly attach the pump to your bike frame using the mounting brackets. Finally, start pumping until your tire is inflated to the desired pressure.
To use a floor pump, first open the jaws of the pump and insert the nozzle onto the valve stem. Then, start pumping until your tire is inflated to the desired pressure.
How Do You Carry Extra Water on a Road Bike?
If you’re planning on riding your road bike for more than an hour or so at a time, you’ll need to find a way to carry extra water with you. The good news is that there are plenty of options available, and which one you choose will largely depend on personal preference. Here are some of the most popular ways to carry extra water on a road bike:
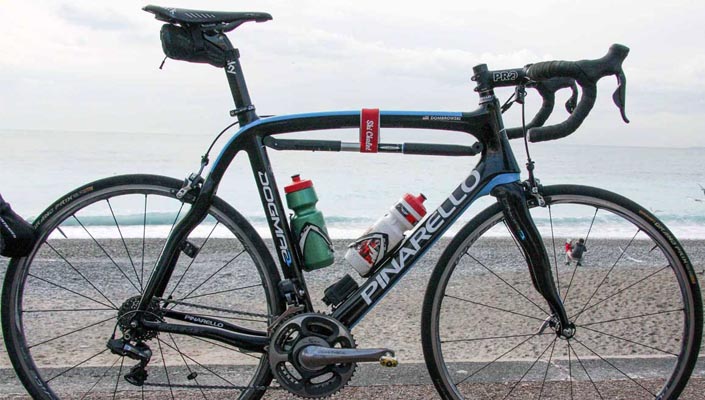
1. Water Bottles and Cage – The most common and straightforward way to carry extra water is simply to use a water bottle and cage attached to your frame. Most road bikes have threaded holes in the frame specifically for this purpose, and there’s a wide variety of both cages and bottles available on the market. If you go this route, make sure to get a cage that’s compatible with your bike’s frame size (most are) and that securely holds the bottle in place even over rough terrain.
2. CamelBak or Other Hydration Pack – A CamelBak or other hydration pack is another great option for carrying extra water on your road bike. These packs strap onto your back like a backpack, but have a special reservoir built in for holding liquid. They also usually have room for carrying other items like food, tools, etc., which can be handy if you’re going on a longer ride where you might need more than just water.
3. Framed Bag – Another option is to use a small bag designed specifically for attaching to the top tube or downtube of your road bike frame. These bags usually have enough room for 1-2 water bottles plus some other small items like energy bars or gels. They’re not as convenient as hydration packs since you still have to stop and reach down to grab your bottle(s), but they can be helpful if you don’t want anything strapped onto your back while riding.
Should I Carry a Bike Pump?
As a cyclist, you are probably familiar with the occasional flat tire. Whether you’re out on a leisurely ride or racing to the finish line, a flat tire can ruin your day. That’s why it’s important to be prepared and have a bike pump handy.
But how do you know if you should carry a bike pump with you?
There are a few things to consider when deciding whether or not to bring a bike pump with you on your ride. First, think about how far you’ll be riding and how much help you’re likely to need if you get a flat tire.
If you’re only going for a short ride around the block, chances are good that you won’t need a bike pump. However, if you’re planning on cycling for several hours or more, it’s definitely worth bringing one along.
Another thing to consider is what type of terrain you’ll be riding on.
If you’re sticking to paved roads, chances are good that you won’t need a bike pump unless you have an unusually high number of flats. However, if you’re venturing off-road onto rougher terrain, carrying a bike pump is definitely advised. That way, if you do get a flat tire,you’ll be able to quickly fix it and get back on the trail without having to walk your bicycle all the way back home.
So, should YOU carry a bike pump? It depends on your individual circumstances but in general, it’s always better to be safe than sorry!
How Do You Carry Stuff on a Road Bike?
Assuming you’re talking about carrying stuff while riding a road bike, there are a few options.
One option is to use a backpack. This can be uncomfortable, especially if you don’t have a good quality backpack designed for cycling.
The straps can also rub on your arms and shoulders.
A second option is to use saddle bags. These attach to the back of your saddle and can hold quite a bit of stuff.
They’re usually more comfortable than backpacks, but they can make it hard to reach your water bottle if it’s in the cage behind the saddle bags.
A third option is to use a handlebar bag. These attach to the front of your handlebars and can be really convenient because they’re right in front of you so you can easily access whatever is inside.
However, they can make steering feel less precise and they add weight to the front of the bike which can make climbing hills more difficult.
Ultimately, it depends on what you’re carrying and where you’re going as to what the best option for carrying stuff on your road bike is. If you’re just going for a short ride with a few essentials, then a backpack or handlebar bag might be fine.
But if you’re going on a longer ride or carrying more things, then saddle bags might be better suited for that purpose.
How To Carry Your Cycling Spares
Conclusion
Assuming you are talking about the blog post titled “How to Carry a Pump on a Road Bike,” the author offers some helpful tips for those who want to take their pump with them on a road bike. He suggests strapping the pump to the frame or seatpost, using a water bottle cage mount, or carrying it in a backpack or pannier. Whichever option you choose, he says, make sure the pump is easily accessible so you can quickly inflate your tires if needed.